Complete Guide to Applying for a Canadian Visa in the US
Introduction:
Beginning at the end of 2018, the Canadian government will require Chinese citizens to provide biometrics for the F1 visas to Canada. This means that the easy online application process will no longer be available and you will have to visit a visa office in person to get your application and visa paperwork. Now is the perfect time to apply for your visa for Canada! If you’re not sure how to apply for an F1 visa, just follow along with our step-by-step guide.
Section 1: The Online Application
- First you’ll have to create an account on the application website. You can create an account here: http://www.cic.gc.ca/english/e-services/mycic.asp
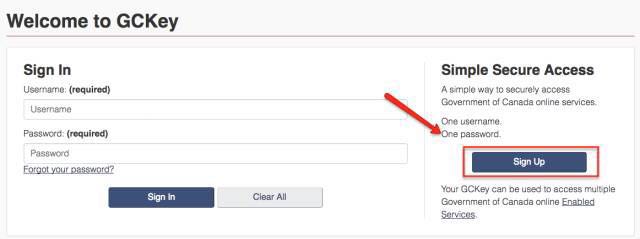
- Click the “Continue to GCKey” button.

- Follow the steps to sign up and create your ID. Make sure you write down and remember your ID and password, as you’ll need them later to sign in again.
- Next, create your recovery questions, along with the answers and hints. These will have to be things you can remember, because one of them will pop-up every time you login. You can also save a screenshot of the page to help you remember.
- Now you’re all signed up! It may sign you in automatically or you can redo the steps above to sign in. You’ll have some options of what to do next. Choose a “Visitor Visa” application.


- Before the official application begins, you’ll have to answer a series of questions. These questions will make sure you are eligible to apply for an f1 visa to Canada. Once the questions are completed, you’ll be taken to the application.

- You will be taken to the “Your document checklist” page to submit all the required documents. There are several things you’ll need for the student visa, which we’ll walk through in the next section of this article.

Section 2: Required Documents
- Application for Student Visa
You can open the form by clicking the document name from the list. However, you may encounter the following error:

If you see this, don’t worry! If your page shown up like this, you just need to download the latest Adobe Acrobat Reader by clicking the link provided by the page.
Adobe Acrobat Reader is available for Windows and Mac. After you download Adobe and the application form, open up in your computer and fill it out! The form is an online document, so you won’t have to print it and scan it. You can fill it out right on your computer.

- Travel History
You can upload your I20 if you are a student. If you are already employed, you can use your I-797A.
- Passport
Scan your passport and make sure to include the page that shows your birth date and country of origin, as well as any pages with stamps, visas or markings.
- Proof of Means of Financial Support
For students, you can upload bank statements from the past four months. It’s advised that you have enough money to cover the cost of your trip to Canada.
- Digital photo
You don’t have to go somewhere official to have this done. Find a white wall and you can take it yourself. The picture should be 35mm X 45mm. You can find more information and photo specifications on the website.
- Purpose of Travel – other
For this, you can just upload your roundtrip flight ticket to Canada or your travel itinerary like a hotel booking. If you haven’t settled your trip yet, no worries! Take advantage of the StudentUniverse 24 hour free cancellation policy to get your air ticket and itinerary without any cost. Just book a ticket that is eligible for the 24-hour free cancellation, save and upload the electronic itinerary, and then cancel the tickets at no cost to you.
- Family Information
This one’s simple: just download the IMM5645 form, fill it out, and upload.
Submit all the forms, enter your name as a signature and congrats: you have already finished half of the process. At this point, you can also pay for the cost of your visa ($100).
Section 3:Send and get back your passport
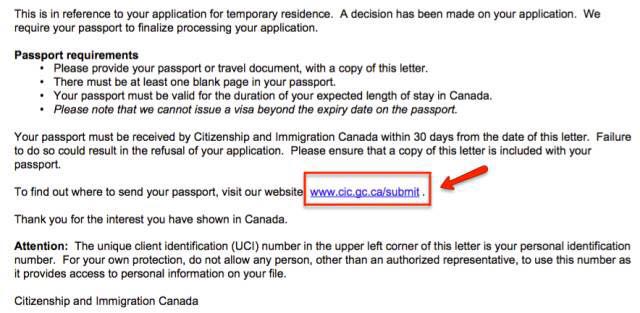
- Once everything is submitted and the payment is complete, you will receive the “Confirmation of Online Application Transmission” email. After a few days, you will receive the “Submission Confirmation” email, which means that your application is in review. After you have passed the review, you will receive the “Original Passport Request,” meaning they are ready to issue a visa for you. At this point you will be required to submit some documents to the Visa Application Center and send your money order to Lockbox.
There are 2 VACs and Lockboxes across the country. If you apply for VAC in New York, send your Money Order to Boston Lockbox and if you choose VAC in Los Angeles, send the Money Order to Dallas Lockbox.
- Required Documents for VAC
The materials required are:
- Passport
- Print out of the request letter from IRCC (the email shown above)
- VAC Consent Form
- Full Contact Information (your name and address, phone number and email on one paper)
- Pre-paid envelope with your address
- Copy of VAC fee (the receipt and a picture prove of the Money Order you paid.)
If you live in New York or LA, you can submit the materials in person at the offices. If not, you can mail your materials. Make sure that you send all of the application materials to the VAC office in Los Angeles or New York, and your payment to the Lockbox in Boston or Dallas.
VAC addresses
Canadian Visa Application Centre –New York
290 Madison Ave, 2nd Floor
New York, NY 10017 USA
Canadian Visa Application Centre – Los Angeles
2120 E Grand Avenue Suite 108A
El Segundo,CA, 90245 USA
- Document for Lockbox
Be sure to double-check the price of money order through the VAC’s official site. And remember that this is the Passport delivery /e-Application fee, not the VAC service fee.
Send the check to
CSRA Consular Services Inc
P.O. Box 419557, Boston, MA 02241-9557
Or
CSRA Consular Services Inc
P.O. Box 841908
Dallas, TX 75284-9557
Don’t forget to include a picture of the check you sent to Lockbox in your package to VAC, so that they know you’ve paid.
- Just Wait!
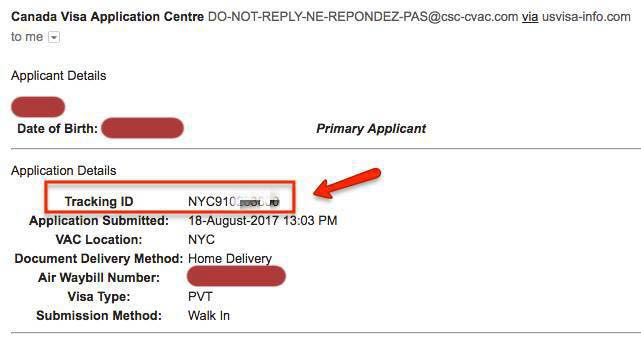
After you send all the documents to the offices, your mission is complete! You’ll receive a confirmation email with the application receipt and a tracking ID. This will let you track your passport through here: https://www.csc-cvac.com/en-us/selfservice/status
And then you should receive back your passport with your new Canada visa within a few weeks! Congratulations! Now, it’s time for you to book a cheap student flights to Canada.
